Post by Hoovie on Feb 8, 2018 12:06:26 GMT
Tue Jul 07, 2015 6:39 pm #1
Hoovie
Many cars headlights start to 'fog' due to the surface reacting to the sun over time. The problem typically starts with the top surface but gradually the entire lens can be affected. This is known to be a problem on many Toyotas, the Generation 7 Celica being especially bad, and for the RAV4s, the 4.2 model seems to be the worse for this currently.
The impact of this is a reduction in efficiency of the lights, and ultimately the vehicle can fail an MOT, with the dealers solution usually being new headlamps! However the fogging is at the surface only and can be fixed without recourse to new lights!
There are many different ways proposed to remedy this, some more effective then others, but if the headlight has got to the stage of incurring an MOT failure or advisory, the more dramatic solutions are required IMO.
This tutorial goes through step by step how to 'de-fog' badly affected headlights. I will be using some equipment which may not be available to everyone, so will indicate substitutions where possible.
It should be noted that this process will remove any UV protection remaining on the headlamp, so further fogging is likely to occur over time, so maintenance of the headlamps in a similar way to the paintwork to prevent gradual oxidization is recommended
Time required: around 90 minutes for a pair
Ability: If anyone has polished a car and used a sander before, they should be able to carry this process out, but neither I or the RAV4 Drivers Club will be held liable for any issues experienced. Most Scrapyards will be willing to give FOC on request a fogged-up headlight to practice on if required.
Equipment:
DA Sander (ALT: Sanding pad on Electric Drill/ 'Mouse' Sander)
Machine Polisher and Pads (ALT: Polishing attachment on Electric Drill)
Degreaser
Water Spray
Paper Towel
Micro Fibre Cloths
Blue 3M low-tack Masking Tape
500 Grit Sanding Discs
1000 Grit Sanding Discs
2000 Grit Sanding Discs
4000 Grit Sanding Discs
(ALT: you need to start at around 500 and end around 3000, while making sure the step ups are not too large - more of which later)
3M Plastic Restorer
3M Plastic Polish
(ALT: These two products have been especially formulated for Plastic headlights. You could substitute for compounds and polishes of a similar cut, but test first!)
Dust Mask

Prior to start:
This is the vehicle I am carrying out the renovation on:
2004 RAV4
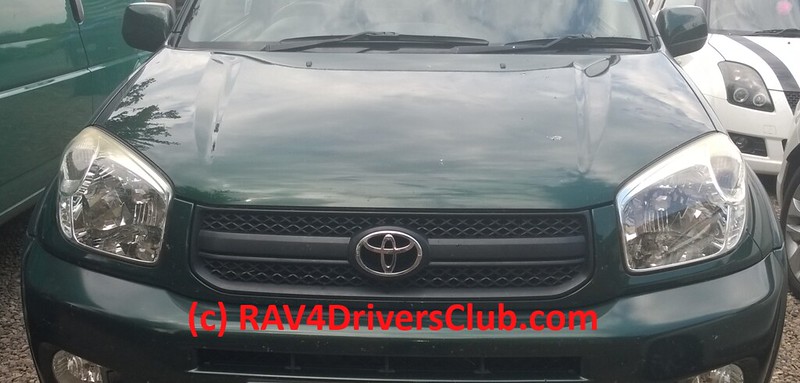 666Head_S0-1 by David, on Flickr
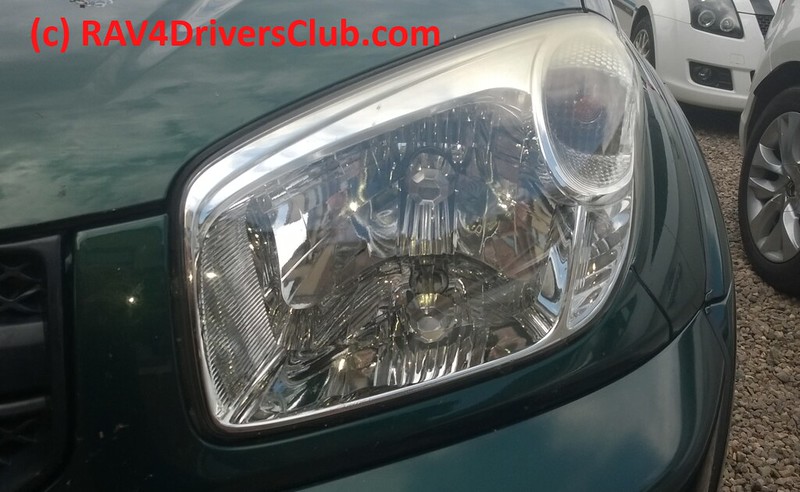 666Head_S0-2 by David, on Flickr
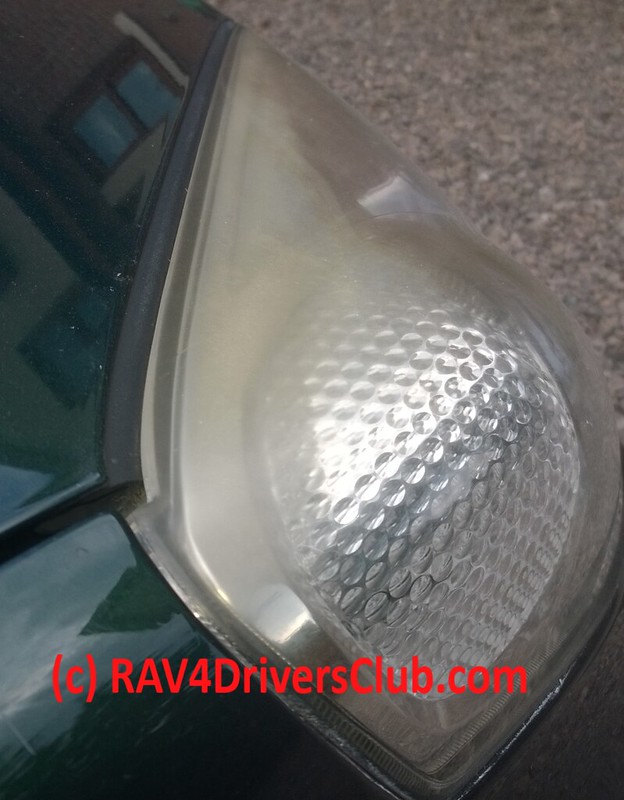 666Head_S0-3 by David, on Flickr
However, for the purpose of this tutorial, I am going to assume the whole lamp needs renovating and work on the whole headlamp
STAGE 1 - 500 GRIT
Wash and Degrease the headlight - this save time and effort sanding dirt and flies!
Using the Blue tape carefully protect the panels around the headlight. I also used some standard masking tape on top of the blue tape, but that is not really needed (I just don't like to take chances!). It is also a lot easier to just lift the bonnet instead of masking its edge.
Once masked off, using the 500 Grit Paper, sand over the area to be renovated. This could potentially be just the top, but I am going to do the entire lamp as discussed ...
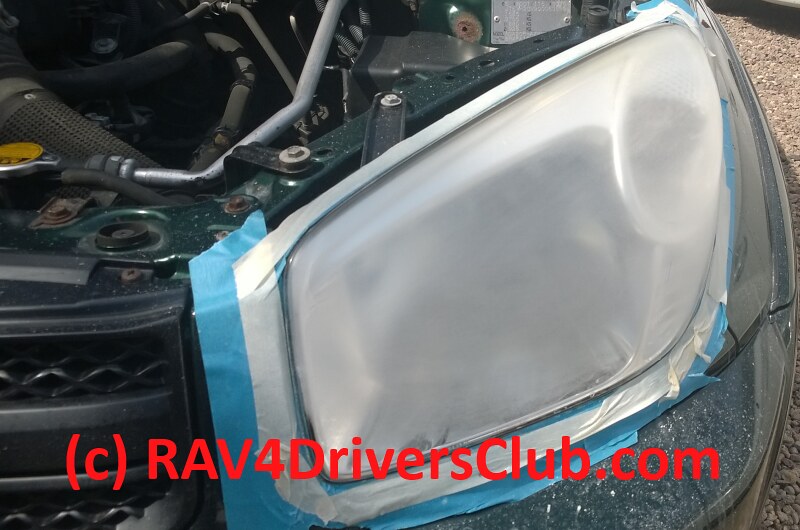 666Head-S1_500 by David, on Flickr
The effect of sanding with 500 Grit is pretty extreme as you can see. It is necessary to sand with care, keeping the sander moving at all time, passing over the entire surface to be worked until the fogging has been eliminated.
Here is a comparison between the two headlamps...
[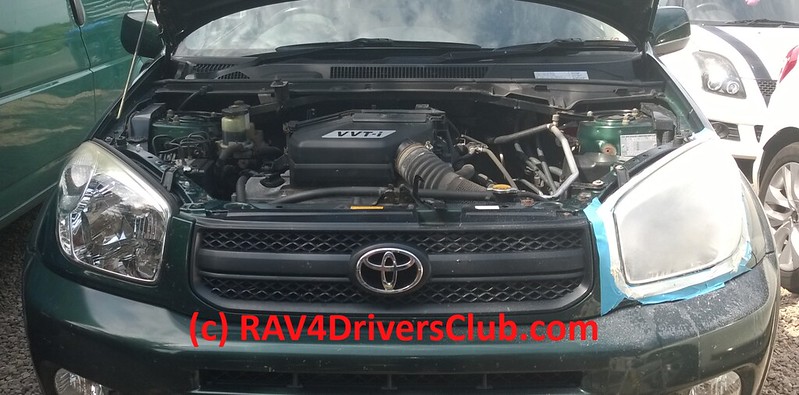 666Head-S1_Post_500-3 by David, on Flickr
STAGE 2 - 1000 GRIT
Wash down the headlamps and switch from the 500 grit to the 1000 grit abrasive. Make sure to cover the entire area you previously applied the 500 paper to, and if just a partial area, extend the 1000 area slightly. Carry on with the 1000 until all the 500 scratches have been eliminated and replaced with finer 1000 grit scratches.
You should see a slightly cleared lamp like below ...
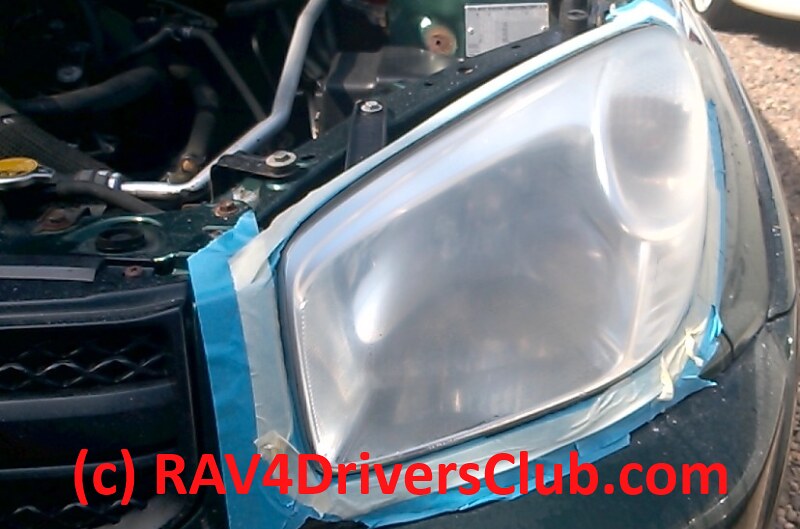 666Head-S2_1000 by David, on Flickr
STAGE 3 - 2000 GRIT
Again, wash down the headlamps and switch from the 1000 grit to the 2000 grit abrasive. As before, sure to cover the entire area you previously applied the 1000 paper to, and if just a partial area, extend the 2000 area slightly. Carry on with the 2000 until all the 1000 scratches have been eliminated and replaced with finer 2000 grit scratches.
Now a word on grit step-ups ... the lower the grit, the more abrasive its surface and aggressive the scratches it creates. If you jump up too great a grit level, the paper may be too fine to be able to eliminate a scratch, so jumping from say 500 to 2000 will probably not remove all scratches - instead of 500 - 1000 - 2000, you could say go to 500 - 800 - 1500 - 2000 , but skipping the 800 or 1500 could be an issue which may not be apparent until later - so I recommend don't skip more then 1 level where possible!
There is an approximate table here which may help with abrasive levels- en.wikipedia.org/wiki/Sandpaper#Grit_size_table
Once the 2000 sanding has been finished, the headlamp should look something like this ...
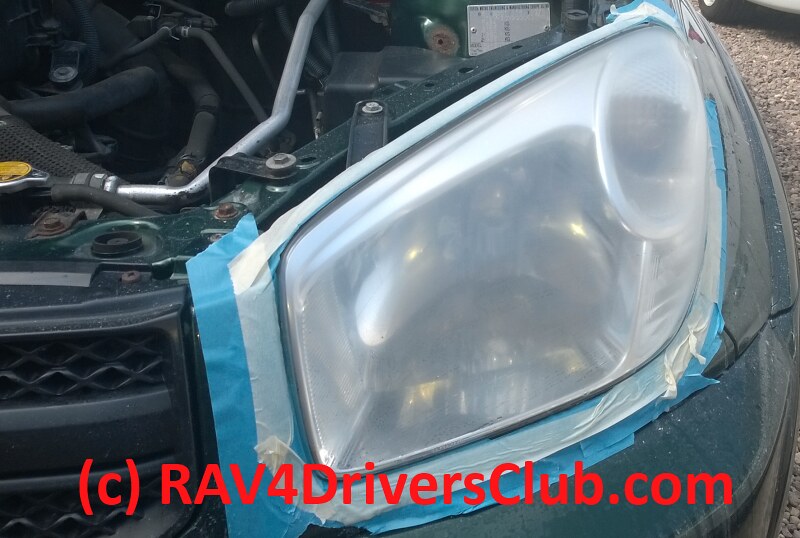 666Head-S3_2000 by David, on Flickr
STAGE 4 - 4000 GRIT
The Final stage of the sanding is the 4000 grit.
Once again, wash down the headlamps and switch from the2000 grit to the 4000 grit abrasive. As before, sure to cover the entire area you previously applied the 1000 paper to, and if just a partial area, extend the 4000 area slightly. Carry on with the 4000 until all the 2000 scratches have been eliminated and replaced with finer 4000 grit scratches.
The headlamp after passing over with the 4000 grit ...
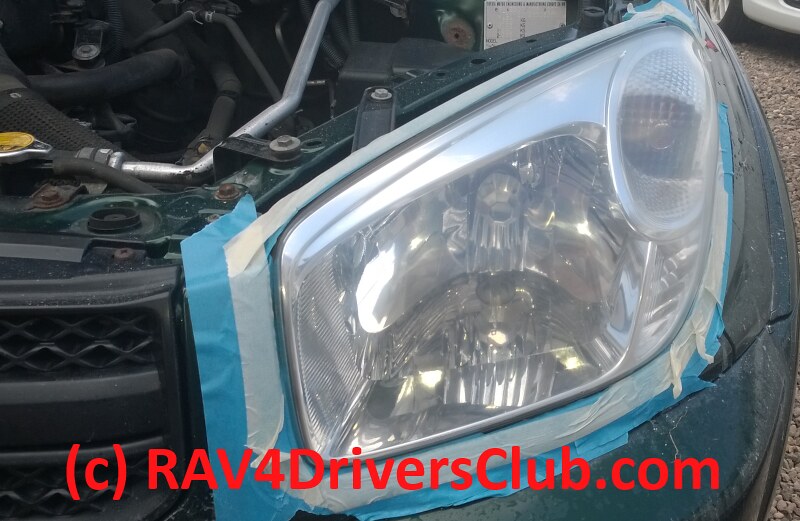 666Head-S4_4000 by David, on Flickr
A word on the sanding pads ... I use Mirka Abralon pads for the 1000, 2000 and 4000 grits. These have two advantages. Firstly, these work well both dry and when wetted, and I tend to do one pass slightly damp and then another with a couple of squirts to provide more lubrication. The second advantage is that these are padded and work well with headlamps with odd contours, such as the slight raised part of the 4.2 light.
STAGE 5 - PLASTIC RESTORER
Now It is time to switch to the Polisher!
Wash down the Headlamp and clean off with the Microfibre cloth. I prefer to use the 3M Yellow Pad with the Plastic Restorer to give a reasonable cut at this stage. Similar to using the polisher on paintwork, I like to use a mist of detailing spray on the headlamp and the pad before applying. I would tend to use the restorer on the entire headlamp
This is the headlamp after the Restorer has been used ...
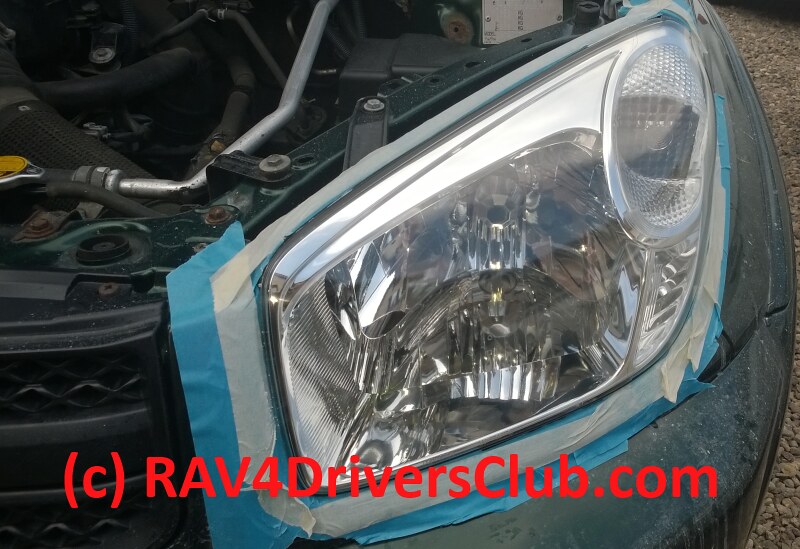 666Head-S5_PlasticRestorer by David, on Flickr
As you can see, we are making progress with getting the lights back to bright again ...
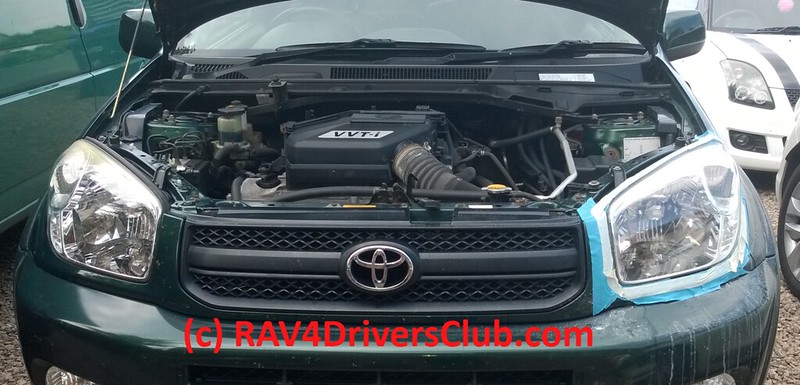 666Head-S5_PlasticRestorer-3 by David, on Flickr
STAGE 6 - PLASTIC POLISH
The Final stage is using the Plastic Polish.
Clean the headlamp ready for the final polish. I like to use the 3M Blue pad with the Plastic Polish and for what is worth, tend to apply it (and other polishes and compounds) like this:

Just like the Restorer, polish the entire headlamp and then give it a clean up with detailer and an MF cloth ...
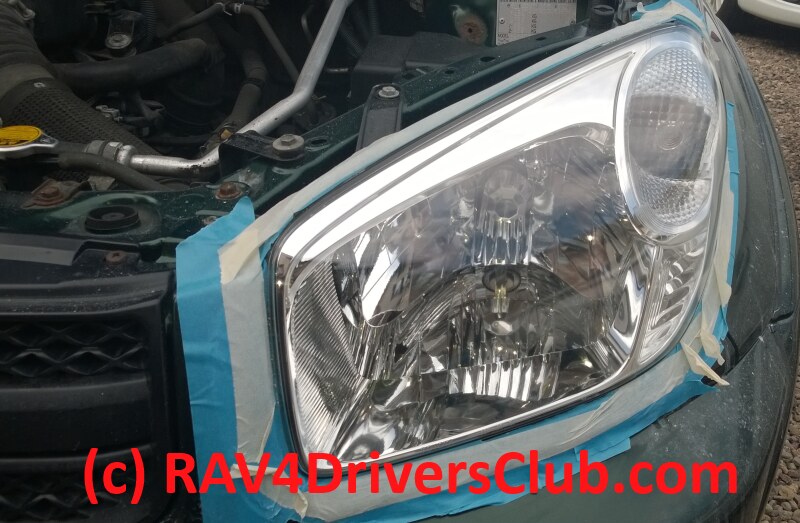 666Head-S6_PlasticPolish by David, on Flickr
Here is a closeup of the top of the two headlamps, one renovated and one as yet untouched ...
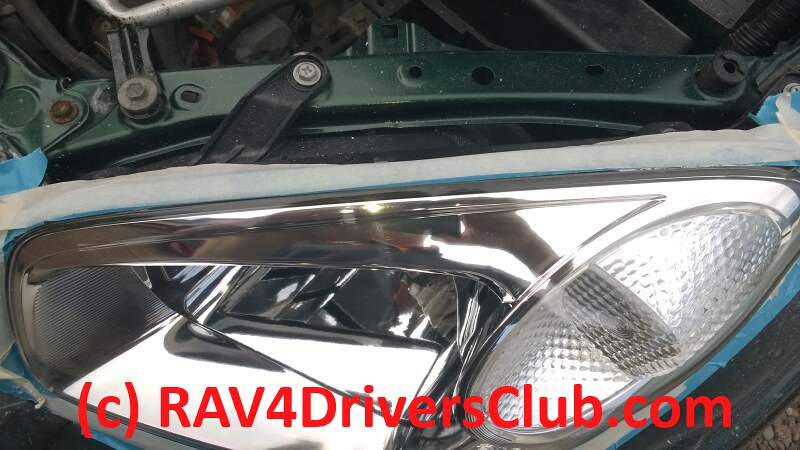 RAV4_Headlights_Top-Renovated by David, on Flickr
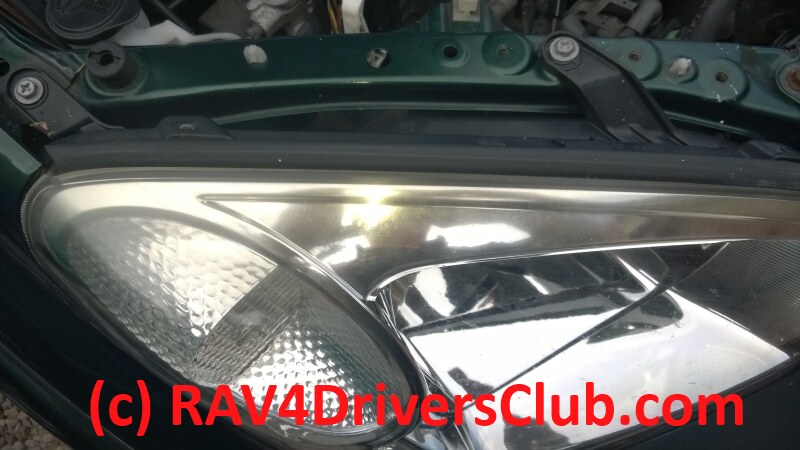 RAV4_Headlights_Top-Pre-Renovated by David, on Flickr
And a frontal comparison before starting on the other headlamp ...
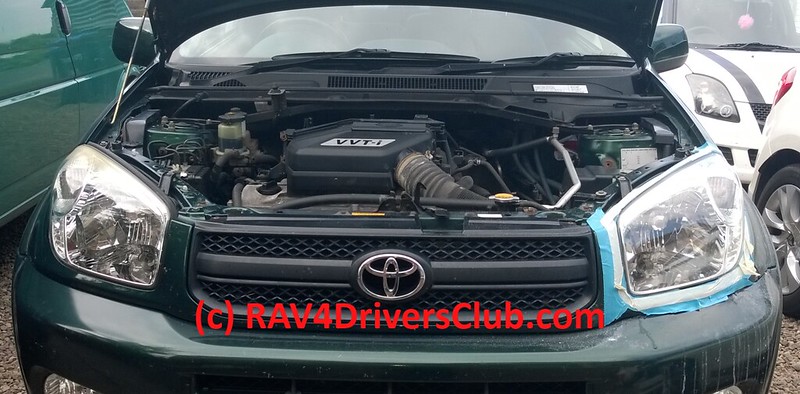 666Head-S6_PlasticPolish-2 by David, on Flickr
And the completed renovation ...
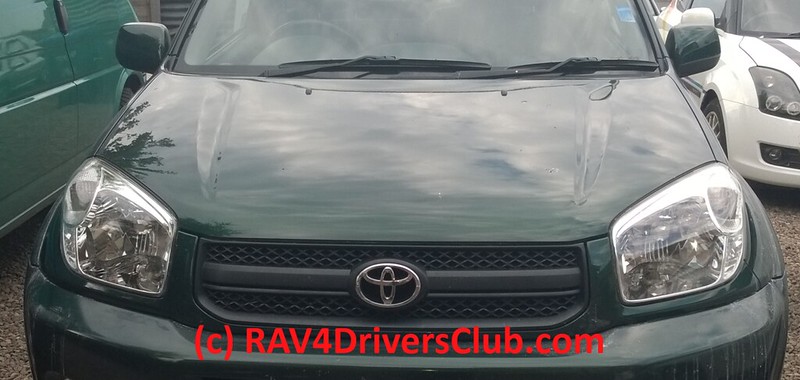 666Head-S6_Headlights_Renovated by David, on Flickr
Hoovie
Many cars headlights start to 'fog' due to the surface reacting to the sun over time. The problem typically starts with the top surface but gradually the entire lens can be affected. This is known to be a problem on many Toyotas, the Generation 7 Celica being especially bad, and for the RAV4s, the 4.2 model seems to be the worse for this currently.
The impact of this is a reduction in efficiency of the lights, and ultimately the vehicle can fail an MOT, with the dealers solution usually being new headlamps! However the fogging is at the surface only and can be fixed without recourse to new lights!
There are many different ways proposed to remedy this, some more effective then others, but if the headlight has got to the stage of incurring an MOT failure or advisory, the more dramatic solutions are required IMO.
This tutorial goes through step by step how to 'de-fog' badly affected headlights. I will be using some equipment which may not be available to everyone, so will indicate substitutions where possible.
It should be noted that this process will remove any UV protection remaining on the headlamp, so further fogging is likely to occur over time, so maintenance of the headlamps in a similar way to the paintwork to prevent gradual oxidization is recommended
Time required: around 90 minutes for a pair
Ability: If anyone has polished a car and used a sander before, they should be able to carry this process out, but neither I or the RAV4 Drivers Club will be held liable for any issues experienced. Most Scrapyards will be willing to give FOC on request a fogged-up headlight to practice on if required.
Equipment:
DA Sander (ALT: Sanding pad on Electric Drill/ 'Mouse' Sander)
Machine Polisher and Pads (ALT: Polishing attachment on Electric Drill)
Degreaser
Water Spray
Paper Towel
Micro Fibre Cloths
Blue 3M low-tack Masking Tape
500 Grit Sanding Discs
1000 Grit Sanding Discs
2000 Grit Sanding Discs
4000 Grit Sanding Discs
(ALT: you need to start at around 500 and end around 3000, while making sure the step ups are not too large - more of which later)
3M Plastic Restorer
3M Plastic Polish
(ALT: These two products have been especially formulated for Plastic headlights. You could substitute for compounds and polishes of a similar cut, but test first!)
Dust Mask

Prior to start:
This is the vehicle I am carrying out the renovation on:
2004 RAV4
 666Head_S0-1 by David, on Flickr
 666Head_S0-2 by David, on Flickr
 666Head_S0-3 by David, on Flickr
However, for the purpose of this tutorial, I am going to assume the whole lamp needs renovating and work on the whole headlamp
STAGE 1 - 500 GRIT
Wash and Degrease the headlight - this save time and effort sanding dirt and flies!
Using the Blue tape carefully protect the panels around the headlight. I also used some standard masking tape on top of the blue tape, but that is not really needed (I just don't like to take chances!). It is also a lot easier to just lift the bonnet instead of masking its edge.
Once masked off, using the 500 Grit Paper, sand over the area to be renovated. This could potentially be just the top, but I am going to do the entire lamp as discussed ...
 666Head-S1_500 by David, on Flickr
The effect of sanding with 500 Grit is pretty extreme as you can see. It is necessary to sand with care, keeping the sander moving at all time, passing over the entire surface to be worked until the fogging has been eliminated.
Here is a comparison between the two headlamps...
[
 666Head-S1_Post_500-3 by David, on Flickr
STAGE 2 - 1000 GRIT
Wash down the headlamps and switch from the 500 grit to the 1000 grit abrasive. Make sure to cover the entire area you previously applied the 500 paper to, and if just a partial area, extend the 1000 area slightly. Carry on with the 1000 until all the 500 scratches have been eliminated and replaced with finer 1000 grit scratches.
You should see a slightly cleared lamp like below ...
 666Head-S2_1000 by David, on Flickr
STAGE 3 - 2000 GRIT
Again, wash down the headlamps and switch from the 1000 grit to the 2000 grit abrasive. As before, sure to cover the entire area you previously applied the 1000 paper to, and if just a partial area, extend the 2000 area slightly. Carry on with the 2000 until all the 1000 scratches have been eliminated and replaced with finer 2000 grit scratches.
Now a word on grit step-ups ... the lower the grit, the more abrasive its surface and aggressive the scratches it creates. If you jump up too great a grit level, the paper may be too fine to be able to eliminate a scratch, so jumping from say 500 to 2000 will probably not remove all scratches - instead of 500 - 1000 - 2000, you could say go to 500 - 800 - 1500 - 2000 , but skipping the 800 or 1500 could be an issue which may not be apparent until later - so I recommend don't skip more then 1 level where possible!
There is an approximate table here which may help with abrasive levels- en.wikipedia.org/wiki/Sandpaper#Grit_size_table
Once the 2000 sanding has been finished, the headlamp should look something like this ...
 666Head-S3_2000 by David, on Flickr
STAGE 4 - 4000 GRIT
The Final stage of the sanding is the 4000 grit.
Once again, wash down the headlamps and switch from the2000 grit to the 4000 grit abrasive. As before, sure to cover the entire area you previously applied the 1000 paper to, and if just a partial area, extend the 4000 area slightly. Carry on with the 4000 until all the 2000 scratches have been eliminated and replaced with finer 4000 grit scratches.
The headlamp after passing over with the 4000 grit ...
 666Head-S4_4000 by David, on Flickr
A word on the sanding pads ... I use Mirka Abralon pads for the 1000, 2000 and 4000 grits. These have two advantages. Firstly, these work well both dry and when wetted, and I tend to do one pass slightly damp and then another with a couple of squirts to provide more lubrication. The second advantage is that these are padded and work well with headlamps with odd contours, such as the slight raised part of the 4.2 light.
STAGE 5 - PLASTIC RESTORER
Now It is time to switch to the Polisher!
Wash down the Headlamp and clean off with the Microfibre cloth. I prefer to use the 3M Yellow Pad with the Plastic Restorer to give a reasonable cut at this stage. Similar to using the polisher on paintwork, I like to use a mist of detailing spray on the headlamp and the pad before applying. I would tend to use the restorer on the entire headlamp
This is the headlamp after the Restorer has been used ...
 666Head-S5_PlasticRestorer by David, on Flickr
As you can see, we are making progress with getting the lights back to bright again ...
 666Head-S5_PlasticRestorer-3 by David, on Flickr
STAGE 6 - PLASTIC POLISH
The Final stage is using the Plastic Polish.
Clean the headlamp ready for the final polish. I like to use the 3M Blue pad with the Plastic Polish and for what is worth, tend to apply it (and other polishes and compounds) like this:

Just like the Restorer, polish the entire headlamp and then give it a clean up with detailer and an MF cloth ...
 666Head-S6_PlasticPolish by David, on Flickr
Here is a closeup of the top of the two headlamps, one renovated and one as yet untouched ...
 RAV4_Headlights_Top-Renovated by David, on Flickr
 RAV4_Headlights_Top-Pre-Renovated by David, on Flickr
And a frontal comparison before starting on the other headlamp ...
 666Head-S6_PlasticPolish-2 by David, on Flickr
And the completed renovation ...
 666Head-S6_Headlights_Renovated by David, on Flickr
